Inverse
Documentation + User Guide


Documentation
Concept Differences
The original game concept document outlined that the final product was going to be focused just as heavily on the visual quality as it was gameplay. This approach was evidently abandoned quite soon after development started, as the only visual refurbishments that were made were primarily to the game’s menus, only adding ambient particles to the gameplay scenes as real decoration. There just wasn’t a decent place for any background sprites, as the background is hardly visible during gameplay scenes. The addition of more complex sprites for the platforms and other interactable game objects just didn’t seem at all possible without reworking most of the level’s layouts and spending many hours changing every platform into individual squares and applying a different sprite to each one based on a sprite sheet. There would be hundreds, if not thousands of tiles to individually go through so it just didn’t seem like an option given the assignment’s time constraints. I instead focused most of my energy enhancing the gameplay elements, as that is equally if not more important than the visual state of a game. With this game, the speedrunning element of it makes refining the gameplay essential, as having a golden run in a level ruined by a factor outside of your control.
I did follow through with the thought of using “puzzle” as a sub-genre of the game, and starting at levels 6 and 7, there is a lot of logical thought that is required to progress through the mechanically complex levels, as the patterns get more challenging to work through and more difficult to learn, but very satisfying once they are completed. By the final release, more original levels had been created than was initially planned, and user feedback heavily influenced the creation process of this level select menu and the organisation and their difficulties in general, more in that in the Testing Summary section. As stated, the concept graphics for the game are in the files but couldn’t properly be implemented. The concept for the gameplay backgrounds did influence the hand-made background seen in the menus of the game, even being “animated” in the title screen.
The initially planned implementation of a scores menu was scrapped completely for something more accessible and understandable in-game, each level’s individual score (time taken to beat it) is displayed below the button that accesses the level in the level select menu, so you are able to easily see which score corresponds to each level and reduce the amount of clutter that would exist by adding a new menu. In the concept document, I talked about the score’s implementation working based on the game being one streamlined level, with just the one score. This approach was abandoned to favour players of all skill brackets, by having a plethora of levels to choose from, each being given a level-specific difficulty rating out of 10, and being placed into the category of easy, medium, or hard. Being able to streamline a run in any of the “hard” levels is incredibly difficult, which is the primary factor in difficulty placement.
The idea of the game’s colour scheme being customisable was mentioned, but considering the amount of internal implementation that would be required for that to be possible, and that the game’s entire theme is built around the two core colours of orange and purple, this didn’t seem like an addition that would benefit the game enough. The only way it would be considered, is as an accessibility option if people with certain colour blindnesses are unable to differentiate between the two colours well enough, but that is yet to be raised as an issue.
Testing Summary
The playtest happened in version 1.3, which was when there were 9 levels, simple menus, and the tutorial.
The overall feedback was exceptionally positive, the game’s reception was primarily defined as “addictive”, “promising” and “polished”. This feedback was obviously an amazing sentiment towards the state of the game, but it is also a flaw in the feedback, as there was little constructive criticism to work off when returning to development after the testing session. Some of the more helpful feedback I received was “Great game so far, just missing some audio to complete the feel”. Audio was mentioned a total of 3 times among the 7 feedback responses, so looking into that did become a priority, though finding applicable sound effects and music loops for menus and gameplay has shown to be incredibly difficult, as nothing seems just right.
I intentionally asked what tester’s least favorite part of the game was, to prompt some undeniably useful feedback, but even then, the responses didn’t suggest many features to change. I’ve continued pondering the statement “Space and W felt wrong for their respective default bindings, but I also couldn't think of better options to change them to”, as setting default controls can greatly influence how intuitive a game can feel, regardless of their customizability. I realized this was a very significant statement when I read it, because pleasing everyone with one control set is a very difficult task. Myself, for example, I play almost all 2d platformers with W as jump, and SPACE as a different action, and until getting multiple testers, I didn’t know this was a somewhat unpopular opinion.
See Image Attachment Figure 1. The results when testers were asked the game’s overall difficulty.
The difficulty of the game was a major section of the feedback, there was a question asking for an overall difficulty rating out of 10, and a question asking for their thoughts on the difficulty scaling throughout the levels. As seen in figure 1, the player’s thoughts on the overall difficulty were very high on average, but this was complimented by some interesting thoughts on the game’s difficulty in general. Some notable responses were:
- “Ramps up pretty well but an "open" level select with no unlock restrictions makes it fun to explore them regardless”
- “I think maybe have another easy level thrown in, but the option to select the level you play makes the scaling not all that important”
- “It increases very quickly but that would only be strange if you had a lot of levels”
- “Difficulty gets a lot harder around 5, the harder levels are really fun though.”
- “seems fine, but I like a challenge. Might not appeal to a wide range of audiences.”
These responses outlined a few things very effectively. Firstly, the harder levels fit their category very well, but there are entertaining in the way that they challenge the player, so this is a good thing. Secondly, the lack of any restrictions on what levels can be played when makes the difficulty scaling more justifiable. Thirdly, the lack of more variety in easier levels hinders game’s accessibility for lower skill players.
While providing a good challenge in a game that requires a high-level competitive skill ceiling is necessary, the casual and lower-skilled players must also be catered to, or that lack of suitable content can make the game seem daunting to frustrating to them. This is what made me organise the levels better by difficulty with the 3-tier categorisation system and making the number of levels be greater in the easy category. This leaves the hard category untouched for those who love a challenge but makes the lower-level gameplay much more accessible.
After the testing session, most features such as the tutorial and the physics system balancing were left untouched as when asked if any bugs/errors were found, six people reported no bugs, and one person reported a minor physics interaction that can safely remain in the game for now but may cause problems when the levels become slightly more diverse in gameplay mechanics. The tutorial will remain exactly as it is due to 100% of responses saying that the tutorial, in its current state, is highly effective at teaching the player of the mechanics of the game.
When prompted for additional features or capabilities they thought should be implemented, most responses made statements such as “Not really, the game is very cohesive” and “none that are in mind”. But a feature mentioned twice was the inclusion of audio, which as previously mentioned led to my extensive research into its implementation and the kinds of sounds to be used in the game. The only other response containing a suggestion simply said “Death Counters”. A concise suggestion, but seeing as audio was mentioned much more frequently and has greater impact on the gameplay’s feeling, the death counter idea was noted, but put on the backburner.
Asset list
Due to the simple nature of the game’s graphics, the list of current assets is rather small, and almost all assets have been made by me due to their simplicity.
See Image Attachment Figure 2. Copilot’s response when prompted for a logo design.
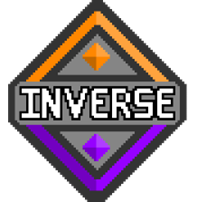
See Image Attachment Figure 3. The game’s logo in its current state.
When prompted for a purple, orange and grey logo for a game centered around the bold word INVERSE, Copilot generated the image seen in figure 2. This was not the visual style I wished to use in my game at all, so I took inspiration in the form of the shape and colour placement and made the logo seen in figure 3 by hand in Piskel, a simple pixel art tool that is feature rich when you need it to be.
See Image Attachment Figure 4. The feedback button’s in-game appearance.
After the playtest, I had the idea to include a feedback button in game that would open the player survey in a new tab when clicked. This is the sprite currently used for that button, represented in game over a light semi-transparent box that changes opacity based on its pressed status. This sprite was also hand-drawn in Piskel.
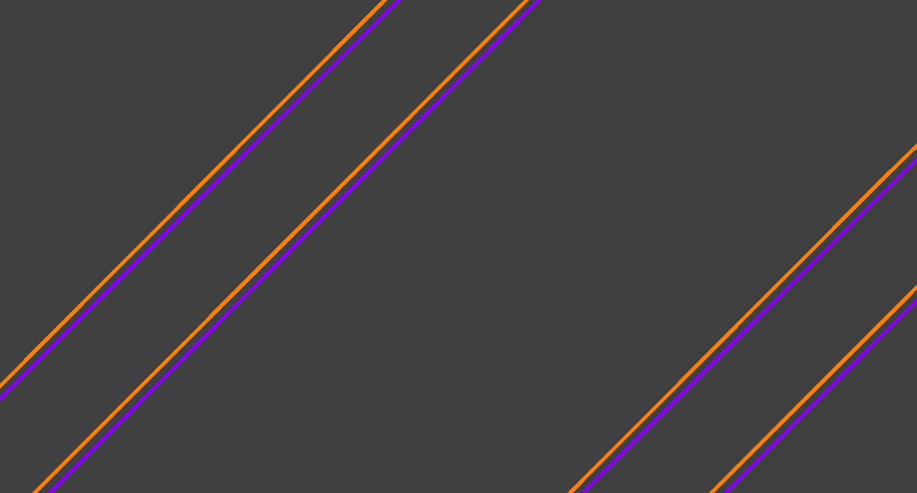
See Image Attachment Figure 5. The current background in all menu scenes.
This is the image that is currently used in all of the game’s menus (not gameplay) as a background. This was hand drawn in Microsoft paint, as Piskel can only handle pixel art up to a certain resolution. This image was originally made in 1920 by 1080 pixels and would be scaled to suit the size of in-game scenes. It’s worth noting that in the game’s title screen, the colours of the lines fade to their opposites every 1.5 seconds to give the menu a lively feel.
See Image Attachment Figure 6. The originally planned block sprites, gif viewable in original game design document
These were the concept sprites made for the tiles in game, but they were not implemented. They remain in the game’s files though, and their first frame has been repurposed as the sprite for most of the game’s menu buttons in both colours.
See Image Attachment Figure 7. The player’s sprites.
These sprites, given their simplicity, were very easy to create by hand in Piskel, and represent the player based on what colour they have selected at any given moment.
All other visual game objects present in the game were constructed of either plain colours, or unity preset visuals.
See Image Attachment Figure 8. The difficulty bars used in game.
These are the bars that give an insight into a level’s difficulty when you hover over a level in the level select menu. They range from difficulty levels 0 to 10, although difficulty 0 is never used. This provides a helpful insight into the difficulty scaling for the player, beyond the simple classification of easy medium or hard. These were also hand-drawn in Piskel.
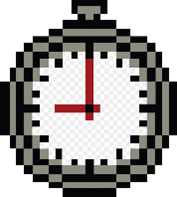
See Image Attachment Figure 9. The stopwatch the player must touch to complete a level.
The object which the player must touch at the end of a level is a stopwatch, as it represents that the time will stop counting. This resource is available for free non-commercial use from pngwing, which is currently suitable.
the two audio files currently are the sound played when clicking a menu button, and the sound played when the player dies respectively.
The explosion comes from MixKit.co, where their free licence permits the use of the audio in a video game.
The clicking sound effect comes from Pixabay.com, where their license summary indicates that the sound can be used freely without attributing the author.
Those are currently all the assets used in-game. All visuals are hand-made with minor external inspiration, and all current audio tracks are under free licensing.
User Guide
The game’s title is Inverse, and this is for a very simple reason. The title in itself is a description of the game’s core mechanic, Inversing.
The default controls are the standard W for jumping and A (left) and D (right) for horizontal movement and Space for inversing.
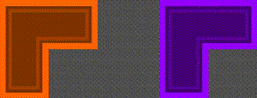
Inversing is the game’s key mechanic and can be done at any time during gameplay to alternate which colour is selected out of orange or purple, and you can only ever be one colour at a time. There are three types of game objects that can be interacted with when you have the same colour as them selected. Those are platforms, spikes, and antigrav fields.
Platforms are typical blocky objects that you can stand on and jump off when you are the same colour as them. They are always represented by a square, rectangle, or other shape with all 90⁰ corners.
Spikes are always representing as triangles, and will destroy the player, making them explode and restart the current level. The spikes come in orange, purple, and red. The coloured spikes can only affect you when you are the same colour as them, while red spikes will always affect you.
Antigrav fields (indicated by the arrow particles they emit) are a mechanic that is used in slightly more advanced sections of levels, and don’t appear that often. While you are the same colour as one, they push you in the direction of the arrow particles they are emitting, effectively changing your gravity. If a level has a grey antigrav field, then it will affect you no matter what colour you are.
During gameplay, you can pause with Escape, and quickly restart a level with R. All controls in the game are customisable with the exception of the pause key, and the tutorial text will update to reflect your current control scheme.
An interactive tutorial is available form the game’s title screen that explains each mechanic and lets you practice it for yourself, and it is highly recommended that you complete it before you attempt to play the game’s levels, though it is not required.
User Guide Explanation
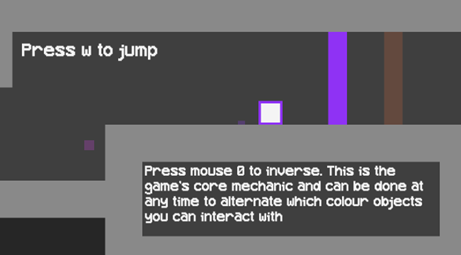
See Image Attachment Figure 10. The beginning gameplay snippet of the tutorial.
The controls of the game are intentionally easy to learn, yet hard to master, as that makes the way the game is played understandable by a very broad audience. The tutorial presents the user with an explanation of all controls (yes the descriptions change based on custom keybinds) and gives provides a small obstacle that the player must overcome using that control to proceed. In figure 9, the player is taught Inversing by giving it a brief explanation, then presenting a wall of each colour the player must pass through using the knowledge they’ve been given.
The default controls are as follows:
- A to move left
- D to move right
- W to jump
- Space to inverse
- R to quick restart
- Escape to pause (not customisable)
Only four of these buttons are used in the actual gameplay, making learning them very simple and intuitive. Left and right movement and jumping are self-explanatory, the explanation for inversing is visible in figure 9, and quick restart simply restarts the current level with no need for a menu interaction.
Reference List
mixkit.co. (n.d.). Mixkit License | Mixkit. [online] Available at: https://mixkit.co/license/#sfxFree.
Pixabay (2023). Pixabay. [online] Pixabay.com. Available at: https://pixabay.com.
www.pngwing.com. (n.d.). Pixel art Drawing, pixels, bead, pixelation, retro Games png | PNGWing. [online] Available at: https://www.pngwing.com/en/free-png-nqvbx
Get Inverse
Inverse
| Status | In development |
| Author | Jezza3137 |
| Genre | Platformer, Puzzle |
| Tags | 2D, Indie, Minimalist, Pixel Art, Short, Side Scroller, Singleplayer, Speedrun |
| Languages | English |
| Accessibility | Subtitles, Configurable controls, High-contrast, Interactive tutorial |
More posts
- ChangelogMay 31, 2024
- Development Progression 4May 26, 2024
- Development Progression 3May 19, 2024
- Development Progression 2May 14, 2024
- Development Progression 1May 06, 2024
- Game ConceptApr 19, 2024
Leave a comment
Log in with itch.io to leave a comment.